
📍 GENERAL INFORMATION
We do accept customer-supplied lights for retrofitting. However, ZLEDS is not responsible for damage due to age, brittle plastics, or prior wear. Please ensure your lights are in solid working condition before shipping them.
ZLEDSLIGHTS.COM
2330 E. Freddy Gonzalez Dr
PMB50
Edinburg,Tx,78542
Yes — we appreciate informed customers! Use code FAQEDUCATED at checkout for a special discount, just for taking the time to read.
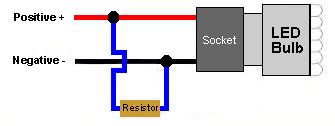
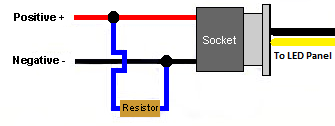
It depends. If your vehicle is already equipped with an LED flasher relay, then you do not need a load resistor.
However, if you’re using the factory flasher setup, then yes, a load resistor is typically required to fix common LED-related issues such as:
-
Hyper flashing
-
No flashing
-
“Bulb out” dash warnings
The resistor has two leads:
-
One connects to the 12V signal wire
-
The other connects to ground
⚠️ Please refer to the wiring diagrams below for details.
If your ZLEDS light assembly doesn’t use a direct plug-and-play connection, follow these steps carefully:
-
Disconnect your vehicle’s battery before doing any wiring to avoid short circuits or damage.
-
Connect any OEM plugs, bulb adapters, or splice connections as required by your setup.
⚙️ Primary Wire Color Guide:
-
BLACK – Ground (0V)
-
GREEN – 12V Parking Light
-
RED – 12V Brake Light
-
YELLOW – 12V Turn Signal
-
WHITE – 12V Reverse Light
-
PURPLE – 12V Controlled/Fused Power Source (max 5A)
-
Connect the crossover cable between both assemblies. Make sure each wire color matches exactly on both ends.
🔥 Warning: Connecting the crossover cable backward will permanently damage the control module and void the product warranty.
Double-check all connections before powering the system to ensure safety and long-term reliability.
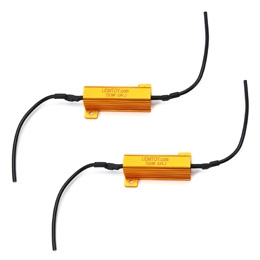
Installing a load resistor can resolve LED turn signal issues such as hyper flashing, no flashing, or “bulb out” warnings on the dash.
The resistor has two leads:
-
One lead connects to the 12V turn signal wire
-
The other lead connects to a solid ground
⚠️ Important: Load resistors get very hot, so mount them on a metal surface away from plastic or wiring.
Check the wiring diagrams below for visual guidance on proper installation.
We recommend using standard RTV silicone to mount the R32 LED panels to the lens. Apply a small amount to position the panels, then let it cure overnight for a secure hold.
Use the circular lens pattern to align the panel precisely at the center.
⚠️ Pro tip: Less is more — avoid using excessive silicone, as it can get messy and affect the final look.
You can also refer to the video below for a visual step-by-step guide.
We recommend using Morimoto RetroRubber Butyl Glue, a reliable and flexible sealing solution designed specifically for automotive lighting. It’s ideal for resealing headlight or tail light assemblies after modification.
You can purchase it directly from theretrofitsource.com.
👉 Important: Ensure the sealing channel is clean and free of old adhesive before applying the new butyl for the best seal and long-term durability.

We recommend using 3M Windo-Weld Round Ribbon Sealer — a high-quality butyl rubber strip. Apply a thin, even bead around the tail light housing during reinstallation. This helps create a watertight seal and prevents water from leaking into your trunk compartment.
👉 Pro tip: Make sure the tail light mounting surface is clean and dry before applying the sealer for best adhesion.

The purple wire is used as an auxiliary 12V trigger input. When activated, it initiates the Strobe or Showcase Sequence defined under Tab 5 of the ZLEDS Bit Editor app.
For safety, we strongly recommend installing:
-
An inline switch to control the trigger manually
-
A 5A fuse to protect the circuit
💼 POLICIES & CANCELLATIONS
We do accept customer-supplied lights for retrofitting. However, ZLEDS is not responsible for damage due to age, brittle plastics, or prior wear. Please ensure your lights are in solid working condition before shipping them.
ZLEDSLIGHTS.COM
2330 E. Freddy Gonzalez Dr
PMB50
Edinburg,Tx,78542
Yes — we appreciate informed customers! Use code FAQEDUCATED at checkout for a special discount, just for taking the time to read.
It depends. If your vehicle is already equipped with an LED flasher relay, then you do not need a load resistor.
However, if you’re using the factory flasher setup, then yes, a load resistor is typically required to fix common LED-related issues such as:
-
Hyper flashing
-
No flashing
-
“Bulb out” dash warnings
The resistor has two leads:
-
One connects to the 12V signal wire
-
The other connects to ground
⚠️ Please refer to the wiring diagrams below for details.
If your ZLEDS light assembly doesn’t use a direct plug-and-play connection, follow these steps carefully:
-
Disconnect your vehicle’s battery before doing any wiring to avoid short circuits or damage.
-
Connect any OEM plugs, bulb adapters, or splice connections as required by your setup.
⚙️ Primary Wire Color Guide:
-
BLACK – Ground (0V)
-
GREEN – 12V Parking Light
-
RED – 12V Brake Light
-
YELLOW – 12V Turn Signal
-
WHITE – 12V Reverse Light
-
PURPLE – 12V Controlled/Fused Power Source (max 5A)
-
Connect the crossover cable between both assemblies. Make sure each wire color matches exactly on both ends.
🔥 Warning: Connecting the crossover cable backward will permanently damage the control module and void the product warranty.
Double-check all connections before powering the system to ensure safety and long-term reliability.
Installing a load resistor can resolve LED turn signal issues such as hyper flashing, no flashing, or “bulb out” warnings on the dash.
The resistor has two leads:
-
One lead connects to the 12V turn signal wire
-
The other lead connects to a solid ground
⚠️ Important: Load resistors get very hot, so mount them on a metal surface away from plastic or wiring.
Check the wiring diagrams below for visual guidance on proper installation.
We recommend using standard RTV silicone to mount the R32 LED panels to the lens. Apply a small amount to position the panels, then let it cure overnight for a secure hold.
Use the circular lens pattern to align the panel precisely at the center.
⚠️ Pro tip: Less is more — avoid using excessive silicone, as it can get messy and affect the final look.
You can also refer to the video below for a visual step-by-step guide.
We recommend using Morimoto RetroRubber Butyl Glue, a reliable and flexible sealing solution designed specifically for automotive lighting. It’s ideal for resealing headlight or tail light assemblies after modification.
You can purchase it directly from theretrofitsource.com.
👉 Important: Ensure the sealing channel is clean and free of old adhesive before applying the new butyl for the best seal and long-term durability.
We recommend using 3M Windo-Weld Round Ribbon Sealer — a high-quality butyl rubber strip. Apply a thin, even bead around the tail light housing during reinstallation. This helps create a watertight seal and prevents water from leaking into your trunk compartment.
👉 Pro tip: Make sure the tail light mounting surface is clean and dry before applying the sealer for best adhesion.
The purple wire is used as an auxiliary 12V trigger input. When activated, it initiates the Strobe or Showcase Sequence defined under Tab 5 of the ZLEDS Bit Editor app.
For safety, we strongly recommend installing:
-
An inline switch to control the trigger manually
-
A 5A fuse to protect the circuit
📦 SHIPPING & ORDER STATUS
We do accept customer-supplied lights for retrofitting. However, ZLEDS is not responsible for damage due to age, brittle plastics, or prior wear. Please ensure your lights are in solid working condition before shipping them.
ZLEDSLIGHTS.COM
2330 E. Freddy Gonzalez Dr
PMB50
Edinburg,Tx,78542
Yes — we appreciate informed customers! Use code FAQEDUCATED at checkout for a special discount, just for taking the time to read.
It depends. If your vehicle is already equipped with an LED flasher relay, then you do not need a load resistor.
However, if you’re using the factory flasher setup, then yes, a load resistor is typically required to fix common LED-related issues such as:
-
Hyper flashing
-
No flashing
-
“Bulb out” dash warnings
The resistor has two leads:
-
One connects to the 12V signal wire
-
The other connects to ground
⚠️ Please refer to the wiring diagrams below for details.
If your ZLEDS light assembly doesn’t use a direct plug-and-play connection, follow these steps carefully:
-
Disconnect your vehicle’s battery before doing any wiring to avoid short circuits or damage.
-
Connect any OEM plugs, bulb adapters, or splice connections as required by your setup.
⚙️ Primary Wire Color Guide:
-
BLACK – Ground (0V)
-
GREEN – 12V Parking Light
-
RED – 12V Brake Light
-
YELLOW – 12V Turn Signal
-
WHITE – 12V Reverse Light
-
PURPLE – 12V Controlled/Fused Power Source (max 5A)
-
Connect the crossover cable between both assemblies. Make sure each wire color matches exactly on both ends.
🔥 Warning: Connecting the crossover cable backward will permanently damage the control module and void the product warranty.
Double-check all connections before powering the system to ensure safety and long-term reliability.
Installing a load resistor can resolve LED turn signal issues such as hyper flashing, no flashing, or “bulb out” warnings on the dash.
The resistor has two leads:
-
One lead connects to the 12V turn signal wire
-
The other lead connects to a solid ground
⚠️ Important: Load resistors get very hot, so mount them on a metal surface away from plastic or wiring.
Check the wiring diagrams below for visual guidance on proper installation.
We recommend using standard RTV silicone to mount the R32 LED panels to the lens. Apply a small amount to position the panels, then let it cure overnight for a secure hold.
Use the circular lens pattern to align the panel precisely at the center.
⚠️ Pro tip: Less is more — avoid using excessive silicone, as it can get messy and affect the final look.
You can also refer to the video below for a visual step-by-step guide.
We recommend using Morimoto RetroRubber Butyl Glue, a reliable and flexible sealing solution designed specifically for automotive lighting. It’s ideal for resealing headlight or tail light assemblies after modification.
You can purchase it directly from theretrofitsource.com.
👉 Important: Ensure the sealing channel is clean and free of old adhesive before applying the new butyl for the best seal and long-term durability.
We recommend using 3M Windo-Weld Round Ribbon Sealer — a high-quality butyl rubber strip. Apply a thin, even bead around the tail light housing during reinstallation. This helps create a watertight seal and prevents water from leaking into your trunk compartment.
👉 Pro tip: Make sure the tail light mounting surface is clean and dry before applying the sealer for best adhesion.
The purple wire is used as an auxiliary 12V trigger input. When activated, it initiates the Strobe or Showcase Sequence defined under Tab 5 of the ZLEDS Bit Editor app.
For safety, we strongly recommend installing:
-
An inline switch to control the trigger manually
-
A 5A fuse to protect the circuit
🔧 TECHNICAL / INSTALLATION HELP
We do accept customer-supplied lights for retrofitting. However, ZLEDS is not responsible for damage due to age, brittle plastics, or prior wear. Please ensure your lights are in solid working condition before shipping them.
ZLEDSLIGHTS.COM
2330 E. Freddy Gonzalez Dr
PMB50
Edinburg,Tx,78542
Yes — we appreciate informed customers! Use code FAQEDUCATED at checkout for a special discount, just for taking the time to read.
It depends. If your vehicle is already equipped with an LED flasher relay, then you do not need a load resistor.
However, if you’re using the factory flasher setup, then yes, a load resistor is typically required to fix common LED-related issues such as:
-
Hyper flashing
-
No flashing
-
“Bulb out” dash warnings
The resistor has two leads:
-
One connects to the 12V signal wire
-
The other connects to ground
⚠️ Please refer to the wiring diagrams below for details.
If your ZLEDS light assembly doesn’t use a direct plug-and-play connection, follow these steps carefully:
-
Disconnect your vehicle’s battery before doing any wiring to avoid short circuits or damage.
-
Connect any OEM plugs, bulb adapters, or splice connections as required by your setup.
⚙️ Primary Wire Color Guide:
-
BLACK – Ground (0V)
-
GREEN – 12V Parking Light
-
RED – 12V Brake Light
-
YELLOW – 12V Turn Signal
-
WHITE – 12V Reverse Light
-
PURPLE – 12V Controlled/Fused Power Source (max 5A)
-
Connect the crossover cable between both assemblies. Make sure each wire color matches exactly on both ends.
🔥 Warning: Connecting the crossover cable backward will permanently damage the control module and void the product warranty.
Double-check all connections before powering the system to ensure safety and long-term reliability.
Installing a load resistor can resolve LED turn signal issues such as hyper flashing, no flashing, or “bulb out” warnings on the dash.
The resistor has two leads:
-
One lead connects to the 12V turn signal wire
-
The other lead connects to a solid ground
⚠️ Important: Load resistors get very hot, so mount them on a metal surface away from plastic or wiring.
Check the wiring diagrams below for visual guidance on proper installation.
We recommend using standard RTV silicone to mount the R32 LED panels to the lens. Apply a small amount to position the panels, then let it cure overnight for a secure hold.
Use the circular lens pattern to align the panel precisely at the center.
⚠️ Pro tip: Less is more — avoid using excessive silicone, as it can get messy and affect the final look.
You can also refer to the video below for a visual step-by-step guide.
We recommend using Morimoto RetroRubber Butyl Glue, a reliable and flexible sealing solution designed specifically for automotive lighting. It’s ideal for resealing headlight or tail light assemblies after modification.
You can purchase it directly from theretrofitsource.com.
👉 Important: Ensure the sealing channel is clean and free of old adhesive before applying the new butyl for the best seal and long-term durability.
We recommend using 3M Windo-Weld Round Ribbon Sealer — a high-quality butyl rubber strip. Apply a thin, even bead around the tail light housing during reinstallation. This helps create a watertight seal and prevents water from leaking into your trunk compartment.
👉 Pro tip: Make sure the tail light mounting surface is clean and dry before applying the sealer for best adhesion.
The purple wire is used as an auxiliary 12V trigger input. When activated, it initiates the Strobe or Showcase Sequence defined under Tab 5 of the ZLEDS Bit Editor app.
For safety, we strongly recommend installing:
-
An inline switch to control the trigger manually
-
A 5A fuse to protect the circuit
🛠️ CUSTOMIZATION & SERVICES
We do accept customer-supplied lights for retrofitting. However, ZLEDS is not responsible for damage due to age, brittle plastics, or prior wear. Please ensure your lights are in solid working condition before shipping them.
ZLEDSLIGHTS.COM
2330 E. Freddy Gonzalez Dr
PMB50
Edinburg,Tx,78542
Yes — we appreciate informed customers! Use code FAQEDUCATED at checkout for a special discount, just for taking the time to read.
It depends. If your vehicle is already equipped with an LED flasher relay, then you do not need a load resistor.
However, if you’re using the factory flasher setup, then yes, a load resistor is typically required to fix common LED-related issues such as:
-
Hyper flashing
-
No flashing
-
“Bulb out” dash warnings
The resistor has two leads:
-
One connects to the 12V signal wire
-
The other connects to ground
⚠️ Please refer to the wiring diagrams below for details.
If your ZLEDS light assembly doesn’t use a direct plug-and-play connection, follow these steps carefully:
-
Disconnect your vehicle’s battery before doing any wiring to avoid short circuits or damage.
-
Connect any OEM plugs, bulb adapters, or splice connections as required by your setup.
⚙️ Primary Wire Color Guide:
-
BLACK – Ground (0V)
-
GREEN – 12V Parking Light
-
RED – 12V Brake Light
-
YELLOW – 12V Turn Signal
-
WHITE – 12V Reverse Light
-
PURPLE – 12V Controlled/Fused Power Source (max 5A)
-
Connect the crossover cable between both assemblies. Make sure each wire color matches exactly on both ends.
🔥 Warning: Connecting the crossover cable backward will permanently damage the control module and void the product warranty.
Double-check all connections before powering the system to ensure safety and long-term reliability.
Installing a load resistor can resolve LED turn signal issues such as hyper flashing, no flashing, or “bulb out” warnings on the dash.
The resistor has two leads:
-
One lead connects to the 12V turn signal wire
-
The other lead connects to a solid ground
⚠️ Important: Load resistors get very hot, so mount them on a metal surface away from plastic or wiring.
Check the wiring diagrams below for visual guidance on proper installation.
We recommend using standard RTV silicone to mount the R32 LED panels to the lens. Apply a small amount to position the panels, then let it cure overnight for a secure hold.
Use the circular lens pattern to align the panel precisely at the center.
⚠️ Pro tip: Less is more — avoid using excessive silicone, as it can get messy and affect the final look.
You can also refer to the video below for a visual step-by-step guide.
We recommend using Morimoto RetroRubber Butyl Glue, a reliable and flexible sealing solution designed specifically for automotive lighting. It’s ideal for resealing headlight or tail light assemblies after modification.
You can purchase it directly from theretrofitsource.com.
👉 Important: Ensure the sealing channel is clean and free of old adhesive before applying the new butyl for the best seal and long-term durability.
We recommend using 3M Windo-Weld Round Ribbon Sealer — a high-quality butyl rubber strip. Apply a thin, even bead around the tail light housing during reinstallation. This helps create a watertight seal and prevents water from leaking into your trunk compartment.
👉 Pro tip: Make sure the tail light mounting surface is clean and dry before applying the sealer for best adhesion.
The purple wire is used as an auxiliary 12V trigger input. When activated, it initiates the Strobe or Showcase Sequence defined under Tab 5 of the ZLEDS Bit Editor app.
For safety, we strongly recommend installing:
-
An inline switch to control the trigger manually
-
A 5A fuse to protect the circuit
📲 ZLED Bit Editor
We do accept customer-supplied lights for retrofitting. However, ZLEDS is not responsible for damage due to age, brittle plastics, or prior wear. Please ensure your lights are in solid working condition before shipping them.
ZLEDSLIGHTS.COM
2330 E. Freddy Gonzalez Dr
PMB50
Edinburg,Tx,78542
Yes — we appreciate informed customers! Use code FAQEDUCATED at checkout for a special discount, just for taking the time to read.
It depends. If your vehicle is already equipped with an LED flasher relay, then you do not need a load resistor.
However, if you’re using the factory flasher setup, then yes, a load resistor is typically required to fix common LED-related issues such as:
-
Hyper flashing
-
No flashing
-
“Bulb out” dash warnings
The resistor has two leads:
-
One connects to the 12V signal wire
-
The other connects to ground
⚠️ Please refer to the wiring diagrams below for details.
If your ZLEDS light assembly doesn’t use a direct plug-and-play connection, follow these steps carefully:
-
Disconnect your vehicle’s battery before doing any wiring to avoid short circuits or damage.
-
Connect any OEM plugs, bulb adapters, or splice connections as required by your setup.
⚙️ Primary Wire Color Guide:
-
BLACK – Ground (0V)
-
GREEN – 12V Parking Light
-
RED – 12V Brake Light
-
YELLOW – 12V Turn Signal
-
WHITE – 12V Reverse Light
-
PURPLE – 12V Controlled/Fused Power Source (max 5A)
-
Connect the crossover cable between both assemblies. Make sure each wire color matches exactly on both ends.
🔥 Warning: Connecting the crossover cable backward will permanently damage the control module and void the product warranty.
Double-check all connections before powering the system to ensure safety and long-term reliability.
Installing a load resistor can resolve LED turn signal issues such as hyper flashing, no flashing, or “bulb out” warnings on the dash.
The resistor has two leads:
-
One lead connects to the 12V turn signal wire
-
The other lead connects to a solid ground
⚠️ Important: Load resistors get very hot, so mount them on a metal surface away from plastic or wiring.
Check the wiring diagrams below for visual guidance on proper installation.
We recommend using standard RTV silicone to mount the R32 LED panels to the lens. Apply a small amount to position the panels, then let it cure overnight for a secure hold.
Use the circular lens pattern to align the panel precisely at the center.
⚠️ Pro tip: Less is more — avoid using excessive silicone, as it can get messy and affect the final look.
You can also refer to the video below for a visual step-by-step guide.
We recommend using Morimoto RetroRubber Butyl Glue, a reliable and flexible sealing solution designed specifically for automotive lighting. It’s ideal for resealing headlight or tail light assemblies after modification.
You can purchase it directly from theretrofitsource.com.
👉 Important: Ensure the sealing channel is clean and free of old adhesive before applying the new butyl for the best seal and long-term durability.
We recommend using 3M Windo-Weld Round Ribbon Sealer — a high-quality butyl rubber strip. Apply a thin, even bead around the tail light housing during reinstallation. This helps create a watertight seal and prevents water from leaking into your trunk compartment.
👉 Pro tip: Make sure the tail light mounting surface is clean and dry before applying the sealer for best adhesion.
The purple wire is used as an auxiliary 12V trigger input. When activated, it initiates the Strobe or Showcase Sequence defined under Tab 5 of the ZLEDS Bit Editor app.
For safety, we strongly recommend installing:
-
An inline switch to control the trigger manually
-
A 5A fuse to protect the circuit
📲 ZLED Bit Editor CASE 15 Commands
We do accept customer-supplied lights for retrofitting. However, ZLEDS is not responsible for damage due to age, brittle plastics, or prior wear. Please ensure your lights are in solid working condition before shipping them.
ZLEDSLIGHTS.COM
2330 E. Freddy Gonzalez Dr
PMB50
Edinburg,Tx,78542
Yes — we appreciate informed customers! Use code FAQEDUCATED at checkout for a special discount, just for taking the time to read.
It depends. If your vehicle is already equipped with an LED flasher relay, then you do not need a load resistor.
However, if you’re using the factory flasher setup, then yes, a load resistor is typically required to fix common LED-related issues such as:
-
Hyper flashing
-
No flashing
-
“Bulb out” dash warnings
The resistor has two leads:
-
One connects to the 12V signal wire
-
The other connects to ground
⚠️ Please refer to the wiring diagrams below for details.
If your ZLEDS light assembly doesn’t use a direct plug-and-play connection, follow these steps carefully:
-
Disconnect your vehicle’s battery before doing any wiring to avoid short circuits or damage.
-
Connect any OEM plugs, bulb adapters, or splice connections as required by your setup.
⚙️ Primary Wire Color Guide:
-
BLACK – Ground (0V)
-
GREEN – 12V Parking Light
-
RED – 12V Brake Light
-
YELLOW – 12V Turn Signal
-
WHITE – 12V Reverse Light
-
PURPLE – 12V Controlled/Fused Power Source (max 5A)
-
Connect the crossover cable between both assemblies. Make sure each wire color matches exactly on both ends.
🔥 Warning: Connecting the crossover cable backward will permanently damage the control module and void the product warranty.
Double-check all connections before powering the system to ensure safety and long-term reliability.
Installing a load resistor can resolve LED turn signal issues such as hyper flashing, no flashing, or “bulb out” warnings on the dash.
The resistor has two leads:
-
One lead connects to the 12V turn signal wire
-
The other lead connects to a solid ground
⚠️ Important: Load resistors get very hot, so mount them on a metal surface away from plastic or wiring.
Check the wiring diagrams below for visual guidance on proper installation.
We recommend using standard RTV silicone to mount the R32 LED panels to the lens. Apply a small amount to position the panels, then let it cure overnight for a secure hold.
Use the circular lens pattern to align the panel precisely at the center.
⚠️ Pro tip: Less is more — avoid using excessive silicone, as it can get messy and affect the final look.
You can also refer to the video below for a visual step-by-step guide.
We recommend using Morimoto RetroRubber Butyl Glue, a reliable and flexible sealing solution designed specifically for automotive lighting. It’s ideal for resealing headlight or tail light assemblies after modification.
You can purchase it directly from theretrofitsource.com.
👉 Important: Ensure the sealing channel is clean and free of old adhesive before applying the new butyl for the best seal and long-term durability.
We recommend using 3M Windo-Weld Round Ribbon Sealer — a high-quality butyl rubber strip. Apply a thin, even bead around the tail light housing during reinstallation. This helps create a watertight seal and prevents water from leaking into your trunk compartment.
👉 Pro tip: Make sure the tail light mounting surface is clean and dry before applying the sealer for best adhesion.
The purple wire is used as an auxiliary 12V trigger input. When activated, it initiates the Strobe or Showcase Sequence defined under Tab 5 of the ZLEDS Bit Editor app.
For safety, we strongly recommend installing:
-
An inline switch to control the trigger manually
-
A 5A fuse to protect the circuit
📦Product Options & Features
We do accept customer-supplied lights for retrofitting. However, ZLEDS is not responsible for damage due to age, brittle plastics, or prior wear. Please ensure your lights are in solid working condition before shipping them.
ZLEDSLIGHTS.COM
2330 E. Freddy Gonzalez Dr
PMB50
Edinburg,Tx,78542
Yes — we appreciate informed customers! Use code FAQEDUCATED at checkout for a special discount, just for taking the time to read.
It depends. If your vehicle is already equipped with an LED flasher relay, then you do not need a load resistor.
However, if you’re using the factory flasher setup, then yes, a load resistor is typically required to fix common LED-related issues such as:
-
Hyper flashing
-
No flashing
-
“Bulb out” dash warnings
The resistor has two leads:
-
One connects to the 12V signal wire
-
The other connects to ground
⚠️ Please refer to the wiring diagrams below for details.
If your ZLEDS light assembly doesn’t use a direct plug-and-play connection, follow these steps carefully:
-
Disconnect your vehicle’s battery before doing any wiring to avoid short circuits or damage.
-
Connect any OEM plugs, bulb adapters, or splice connections as required by your setup.
⚙️ Primary Wire Color Guide:
-
BLACK – Ground (0V)
-
GREEN – 12V Parking Light
-
RED – 12V Brake Light
-
YELLOW – 12V Turn Signal
-
WHITE – 12V Reverse Light
-
PURPLE – 12V Controlled/Fused Power Source (max 5A)
-
Connect the crossover cable between both assemblies. Make sure each wire color matches exactly on both ends.
🔥 Warning: Connecting the crossover cable backward will permanently damage the control module and void the product warranty.
Double-check all connections before powering the system to ensure safety and long-term reliability.
Installing a load resistor can resolve LED turn signal issues such as hyper flashing, no flashing, or “bulb out” warnings on the dash.
The resistor has two leads:
-
One lead connects to the 12V turn signal wire
-
The other lead connects to a solid ground
⚠️ Important: Load resistors get very hot, so mount them on a metal surface away from plastic or wiring.
Check the wiring diagrams below for visual guidance on proper installation.
We recommend using standard RTV silicone to mount the R32 LED panels to the lens. Apply a small amount to position the panels, then let it cure overnight for a secure hold.
Use the circular lens pattern to align the panel precisely at the center.
⚠️ Pro tip: Less is more — avoid using excessive silicone, as it can get messy and affect the final look.
You can also refer to the video below for a visual step-by-step guide.
We recommend using Morimoto RetroRubber Butyl Glue, a reliable and flexible sealing solution designed specifically for automotive lighting. It’s ideal for resealing headlight or tail light assemblies after modification.
You can purchase it directly from theretrofitsource.com.
👉 Important: Ensure the sealing channel is clean and free of old adhesive before applying the new butyl for the best seal and long-term durability.
We recommend using 3M Windo-Weld Round Ribbon Sealer — a high-quality butyl rubber strip. Apply a thin, even bead around the tail light housing during reinstallation. This helps create a watertight seal and prevents water from leaking into your trunk compartment.
👉 Pro tip: Make sure the tail light mounting surface is clean and dry before applying the sealer for best adhesion.
The purple wire is used as an auxiliary 12V trigger input. When activated, it initiates the Strobe or Showcase Sequence defined under Tab 5 of the ZLEDS Bit Editor app.
For safety, we strongly recommend installing:
-
An inline switch to control the trigger manually
-
A 5A fuse to protect the circuit