📍 GENERAL INFORMATION
Pricing depends on your vehicle and the type of retrofit you’re interested in. To view available models and service options, please visit our Service Page.
Most services are divided into stages, based on features and complexity:
🔹 Stage 1 – Static LED Retrofit
A clean, non-animated setup — solid lighting only, no sequences or effects.
🔸 Stage 2 – Sequential LED Effects
Adds the classic flowing turn signal or brake light effect for added motion and visibility.
🟣 Stage 3B – Bluetooth + Bit Editor App
Uses the same LED hardware as Stage 3, but with an upgraded controller that lets you create your own sequences and presets via the Bit Editor app.
🟥 Stage 4 – Advanced DigiC40 Integration
Fully customizable animations using all available channels on the DigiC40 controller. Ideal for show builds or complex designs.
If your vehicle is not listed, we may be able to offer a custom solution, depending on current workload. Please note that custom development will incur additional R&D charges, based on the size, complexity, and shape of the LED panel or circuit design.
We accept secure online payments through Square and Stripe, two of the most trusted payment processors.
You can pay using:
-
Major credit and debit cards (Visa, MasterCard, American Express, etc.)
-
Apple Pay or Google Pay (if enabled through your browser/device)
All transactions are encrypted and handled securely to protect your information.
Our workshop is located in Edinburg, Texas. We operate by appointment only and do not offer walk-in service at this time. All work is handled through our online order and shipping process.
💼 POLICIES & CANCELLATIONS
Yes. All ZLEDS custom retrofit lights include a 1-year limited warranty covering defects in materials and workmanship. For full details, visit our Warranty & Disclaimer section.
Yes! We love seeing our work out in the wild — and we reward customers who share quality content:
-
📸 Up to 5% off when you send us high-resolution photos of our products installed
-
🎥 Up to 10% off when you send us a high-definition video (uploaded via Google Drive)
We’ll happily blur license plates or faces upon request before using your content for promotion.
Not at this time — we currently do not offer group buy or bulk order discounts. However, we may explore special promotions or collaborations in the future, so stay tuned!
Due to the custom nature of our services, returns are not accepted. Cancellations made before processing are subject to a 20% fee. Once processing begins, the sale is final.
📦 SHIPPING & ORDER STATUS
Shipping rates vary based on the size of your order and destination. Here’s a general breakdown:
📦 Domestic Orders:
-
Small packages (e.g., parts or panels): typically under $35USD via USPS Priority
-
Larger packages (e.g., full light assemblies): typically start at $75USD via FedEx Ground
🌍 International Orders:
-
USPS International Priority/Express: start at $65 USD for small packages
-
FedEx International: starts at $250 USD and may increase depending on destination and package size
If you have a preferred carrier or special request, feel free to contact us before placing your order.
All orders are processed on a first-come, first-served basis, based on your order number.
-
After placing an order, you’ll receive a confirmation email with your order number.
-
While your order is in queue, we’ll begin acquiring all the required components for your project.
-
When your order reaches the top of the queue, you’ll receive a second email update with its new status.
You’re welcome to reach out for updates at any time — just include your order number in the message for faster service.
You can track the status of your order by visiting our main service page and scrolling to the bottom. There, you’ll find a live order queue showing which orders are currently being processed, completed, or in line.
Once your order ships, you’ll receive a tracking number via email.
For domestic orders, we primarily ship via USPS Priority Mail, which includes tracking and insurance.
We can also accommodate UPS or FedEx shipping upon request or at our discretion, depending on order size and location.
For international orders, we offer:
-
USPS International Express (fast and cost-effective for most countries)
-
FedEx International — available by request at a premium rate
If you have special shipping needs, just let us know during checkout or via email and we’ll do our best to accommodate.
Yes. We ship worldwide via USPS, UPS, or FedEx. Import taxes, duties, and other customs fees are not included and must be paid by the customer.
Our color progress bar gives you a quick visual update on your order status:
-
🔵 Blue – Your order is in queue and awaiting its turn in the build process
-
🔴 Red – Your order is currently being processed (build or customization in progress)
-
🟢 Green – Your order is complete and will be shipping soon
If you ever need more detailed updates, feel free to reach out with your order number.
If your package arrives damaged, contact us within 48 hours with photos of the packaging and product. We’ll assist with the shipping claim and offer a replacement or refund if the carrier approves the damage. Review our Warranty and Disclaimer for full details.
Typical processing times for standard orders range from 1-4 weeks, depending on the complexity of your order and queue volume. You’ll receive tracking info once your order ships.
We follow a first-come, first-served system based on your order number — but multiple factors influence when your order enters production:
🔹 Order Type
-
🛠️ DIY Parts & Kits – Typically processed quickly due to minimal setup
-
🔧 Standard Retrofit Services – Require assembly, wiring, and bench testing
-
🔬 Custom R&D Projects – Involve new design, layout, or testing and may take longer
🔹 Payment Status
-
💰 Fully Paid Retrofit Orders are prioritized over orders secured with a down payment
-
🕓 Down Payment Orders are queued, but work begins only after final payment is received
🔹 Rush Orders (Premium Priority)
Occasionally, we accept a priority rush order from a client willing to pay a premium to expedite production.
⚠️ Important: We can only accommodate one of these rush orders at a time, and it is treated as an exception — not a general option available to all customers.
🔧 TECHNICAL / INSTALLATION HELP
We do accept customer-supplied lights for retrofitting. However, ZLEDS is not responsible for damage due to age, brittle plastics, or prior wear. Please ensure your lights are in solid working condition before shipping them.
ZLEDSLIGHTS.COM
2330 E. Freddy Gonzalez Dr
PMB50
Edinburg,Tx,78542
Yes — we appreciate informed customers! Use code FAQEDUCATED at checkout for a special discount, just for taking the time to read.
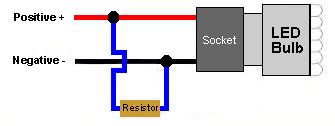
It depends. If your vehicle is already equipped with an LED flasher relay, then you do not need a load resistor.
However, if you’re using the factory flasher setup, then yes, a load resistor is typically required to fix common LED-related issues such as:
-
Hyper flashing
-
No flashing
-
“Bulb out” dash warnings
The resistor has two leads:
-
One connects to the 12V signal wire
-
The other connects to ground
⚠️ Please refer to the wiring diagrams below for details.
If your ZLEDS light assembly doesn’t use a direct plug-and-play connection, follow these steps carefully:
-
Disconnect your vehicle’s battery before doing any wiring to avoid short circuits or damage.
-
Connect any OEM plugs, bulb adapters, or splice connections as required by your setup.
⚙️ Primary Wire Color Guide:
-
BLACK – Ground (0V)
-
GREEN – 12V Parking Light
-
RED – 12V Brake Light
-
YELLOW – 12V Turn Signal
-
WHITE – 12V Reverse Light
-
PURPLE – 12V Controlled/Fused Power Source (max 5A)
-
Connect the crossover cable between both assemblies. Make sure each wire color matches exactly on both ends.
🔥 Warning: Connecting the crossover cable backward will permanently damage the control module and void the product warranty.
Double-check all connections before powering the system to ensure safety and long-term reliability.
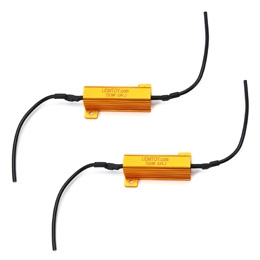
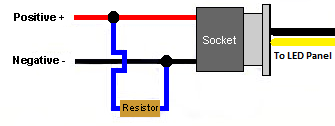
Installing a load resistor can resolve LED turn signal issues such as hyper flashing, no flashing, or “bulb out” warnings on the dash.
The resistor has two leads:
-
One lead connects to the 12V turn signal wire
-
The other lead connects to a solid ground
⚠️ Important: Load resistors get very hot, so mount them on a metal surface away from plastic or wiring.
Check the wiring diagrams below for visual guidance on proper installation.
We recommend using standard RTV silicone to mount the R32 LED panels to the lens. Apply a small amount to position the panels, then let it cure overnight for a secure hold.
Use the circular lens pattern to align the panel precisely at the center.
⚠️ Pro tip: Less is more — avoid using excessive silicone, as it can get messy and affect the final look.
You can also refer to the video below for a visual step-by-step guide.
We recommend using Morimoto RetroRubber Butyl Glue, a reliable and flexible sealing solution designed specifically for automotive lighting. It’s ideal for resealing headlight or tail light assemblies after modification.
You can purchase it directly from theretrofitsource.com.
👉 Important: Ensure the sealing channel is clean and free of old adhesive before applying the new butyl for the best seal and long-term durability.

We recommend using 3M Windo-Weld Round Ribbon Sealer — a high-quality butyl rubber strip. Apply a thin, even bead around the tail light housing during reinstallation. This helps create a watertight seal and prevents water from leaking into your trunk compartment.
👉 Pro tip: Make sure the tail light mounting surface is clean and dry before applying the sealer for best adhesion.

The purple wire is used as an auxiliary 12V trigger input. When activated, it initiates the Strobe or Showcase Sequence defined under Tab 5 of the ZLEDS Bit Editor app.
For safety, we strongly recommend installing:
-
An inline switch to control the trigger manually
-
A 5A fuse to protect the circuit
🛠️ CUSTOMIZATION & SERVICES
Absolutely! We offer fully custom LED layouts and designs built to your exact vision and specifications.
Keep in mind that custom projects may involve additional design, prototyping, and R&D costs, which can significantly increase the overall price. If you’re serious about a one-of-a-kind setup, we’re ready to make it happen — just bring your idea and budget to the table.
We’re always open to collaborating with passionate builders — but sponsorships are limited and selective.
To be considered, you must meet the following criteria:
-
Your vehicle must be listed on our current service lineup
-
You must have an active social media presence (Instagram, YouTube, Facebook, etc.)
-
Your platform should have a significant following and engagement that can help promote the ZLEDS brand
If you meet these requirements and are serious about a partnership, feel free to reach out with your build details and social media links for review.
ZLEDS offers several acrylic overlay options to enhance the visual appearance of your LED panels. These overlays are cosmetic and do not affect functionality, but can slightly alter brightness depending on your selection.
- ◽ Clear Overlay: Exposes the raw LED circuit layout. Ideal for customers who prefer a mechanical, high-tech look.
- ⬛ Tinted Overlay: A dark smoked acrylic lens that conceals the LEDs when off, offering a stealthy, modern appearance. Note: Tinted overlays will slightly reduce overall brightness.
- ⭕ Perimeter Ring: Covers the outer halo to diffuse the light output, creating a smooth and uniform LED glow.
- 🔲 Incognito Panel: Covers the center panel area, fully hiding the LED segments when off for a clean, OEM-like finish.
🔧 Note: These overlays are purely visual — not required for functionality and may affect brightness depending on tint level.
📲 ZLED Bit Editor
1. 📥 Install the ZLED Bit Editor App
Search ZLED Bit Editor on the App Store (iOS) or Google Play (Android), or use the direct links below.
⚠️ Make sure to grant all permissions when prompted. The app will not function correctly without them.
2. 🔌 Power On the Lights
Turn on your running lights , this powers the controller and activates Bluetooth mode.
3. 📡 Pair with Your Device
-
Launch the ZLED Bit Editor app.
-
On first launch, the app will begin scanning for nearby Bluetooth devices.
-
Select the device labeled ZLEDSxxxx.
4. 🔐 Set Your Access PIN
-
Open the Menu and choose Access ID.
-
Set your security PIN. Once accepted, the Editor Tabs (1–5) will become available.
-
If the tabs do not appear:
-
Turn off the running lights for a few seconds, then power them back on.
-
Restart the app completely and retry the pairing process.
-
5. ☁️ Sync the Default Presets
-
Go to Menu > Sync Presets.
-
This will download default presets from our server to your phone.
-
You can now upload and customize them through the editor tabs.
🧭 Tab Function: In most cases, each tab controls the following
| Tab | Function |
|---|---|
| 1 | Running Lights |
| 2 | Brake Lights |
| 3 | Turn Signals |
| 4 | Reverse Lights |
| 5 | Strobe/Showcase |
-
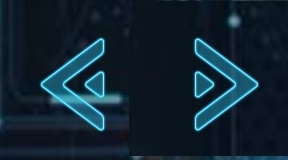
Use the Left/Right Arrows to browse through saved presets.
-
Use the Up Arrow Icon to upload the selected preset to your lights.
🧙♂️ MagicHat Controls (Advanced)
-
Use switches 1–5 to trigger each function manually.
-
The MagicHat tab lets you adjust internal timing effects in real time.
-
These settings are temporary and will reset when power is turned off.
If your firmware version is 1.89 or higher, these sliders allow you to cycle through different memory slots for additional configurations.
In the ZLED Bit Editor app, the Switchback Frame allows you to temporarily mask or disable specific bits (channels) used in lower-priority functions, giving higher-priority functions full control over those bits without interference.
Each tab in the app represents a lighting function and is assigned a priority level:
-
Tab 1 = Lowest Priority (e.g., Running Lights)
-
Tab 5 = Highest Priority (e.g., Strobes or Showcases)
Here’s how it works:
-
Let’s say Tab 1 uses Bits 1–10 for a running light animation.
-
Tab 2 also wants to use Bits 5–10 for a different brake sequence.
-
Without switchback masking, both animations would overlap and conflict.
By selecting Bits 5–10 in the Switchback Frame of Tab 2, you temporarily block those bits from being activated by Tab 1 whenever Tab 2 is active. This ensures that each function can play out cleanly with no overlap or interference.
🛠️ Tip: Use switchback masking anytime you need clean separation between overlapping bit channels across functions.
🔧 ZLED Bit Editor App – Editor Tab Reference
 |
Controller Selector / Memory Slot Selector
Firmware <1.5: Select which controller to configure (if multiple are paired). |
 |
Sequence Speed
Adjust the animation playback speed: |
 |
Loop Mode
Controls how the animation behaves at the end: |
 |
Brightness
Sets the overall output intensity: |
 |
Switchback Delay Timer
Starts a delay after the sequence is turned off, before lower-priority tabs are allowed to take back control of the selected bits. |
 |
Saved Preset Cycle
Use the arrows to browse through your saved animation presets. |
 🧠 Bit Editor
The ZLED Bit Editor allows you to control up to 40 output channels, each powering an individual LED or LED group. These outputs are represented by circular toggle switches in the app.
💡 Swipe left or right to cycle between the Switchback Frame and your Frame(s).
Each frame is a snapshot showing which channels (bits) are active. Tapping a circle turns it red, meaning that bit will be turned ON during that frame.
You can build animations by adding multiple frames:
- Frame 1: Activates your selected LEDs
- Frame 2: Changes to a new configuration
- The sequence plays frame by frame like an animation
Depending on your settings:
- The final frame can either stay on or loop back to Frame 1
- You control this behavior with the loop mode slider
This gives you full control over turn signals, brake effects, running light designs, and advanced light shows.
🛠️ Bottom Menu Functions
 |
Delete Frame
Removes the currently selected frame from the sequence. |
 |
Add Frame
Creates a new blank frame to build upon. |
 |
Upload Preset
Sends your current animation or preset to the controller. |
The ZLED Bit Editor lets you create dynamic lighting animations by combining multiple frames. Each frame is a snapshot of which LEDs (channels) are active.
🧠 Frame Logic:
-
Each circle in the editor represents an output channel.
-
Red = ON, White = OFF — tapping a circle toggles that channel’s state for the current frame.
-
When you add more frames, the app will play them in order to create an animation.
🔧 Building a Sequence:
-
Tap circles to turn bits ON or OFF for Frame 1.
-
Tap ➕ Add Frame to insert another frame.
-
Adjust the active bits in the new frame to create visual motion.
-
Repeat as needed.
-
Choose how the animation behaves using the Loop Mode slider:
-
0 = Holdon the last frame -
1 = Loopthe animation back to Frame 1
-
-
Control animation playback speed using the Sequence Speed slider (
1 = slowest,15 = fastest). -
Once you’re ready, tap 📤 Upload Preset to send the sequence to your lights.
⚠️ Frame Limitations Based on Firmware:
-
Firmware 1.6 and below:
⏳ Max 200 frames per sequence. The top slider controls which controller is being edited (if more than one is paired). -
Firmware 1.7 and above:
🔄 Max 35 frames per sequence, but now supports multiple memory banks.
The top slider becomes a Memory Bank Selector — letting you upload multiple presets and instantly switch between them!
The Switchback Frame acts as a temporary mask that disables specific channels (bits) from any lower-priority tabs while a higher-priority function is active.
In the ZLED Bit Editor app:
-
Each tab represents a lighting function (e.g. Tab 1 = Running Lights, Tab 2 = Brakes, up to Tab 5 = Strobes).
-
Tabs follow a priority system: Tab 1 has the lowest, Tab 5 has the highest.
Let’s say:
-
Tab 1 uses bits 1–10 for a running light pattern.
-
Tab 2 (brake lights) also needs to use bits 5–10.
If both tabs share the same channels without masking, the sequences will blend or conflict.
By assigning bits 5–10 in Tab 2’s Switchback Frame, those bits are temporarily disabled from Tab 1’s output while Tab 2 is active.
This allows the brake light (Tab 2) to cleanly override any shared channels from the running lights (Tab 1), avoiding flickering or overlapping effects.
✅ Best practice: Always use the switchback frame when two tabs share the same bits but need to behave independently.
If the ZLED Bit Editor app fails to connect or doesn’t show the editor tabs, it’s usually due to one of the following issues:
✅ Checklist to Resolve the Issue:
-
Ensure Lights Are Powered On
-
The lights must be on (running lights active) for the Bluetooth module to power up and broadcast.
-
-
App Permissions
-
Make sure the app has all permissions enabled — especially Bluetooth and Location. Without these, the scan and connection process will fail (Android 10+ requires location access to scan Bluetooth).
-
-
First-Time Pairing
-
On first launch, the app will scan for nearby devices. Look for a device named ZLEDSxxxx.
-
Tap the name to connect. If nothing appears, turn your lights off for 5 seconds and back on, then restart the app.
-
-
Set Your Access ID
-
After connecting, open the menu and set your Access ID (PIN). This is required to unlock the editor tabs.
-
If you skip this step, tabs will remain hidden.
-
-
No Tabs Showing After Setup?
-
Fully close the app and power cycle the lights.
-
Open the app again; it should auto-connect and unlock the tabs.
-
-
Firmware Compatibility
-
Ensure your controller has firmware 1.60 or above for best compatibility with recent app versions.
-
💡 If all else fails:
-
Try using another phone/tablet to rule out device-specific Bluetooth or permission issues.
-
Contact us with your controller version and app behavior for direct help.
🔐 What is the Access ID, and why is it required?
The Access ID is a unique, hardcoded security code embedded into the firmware of each ZLEDS controller. It acts as a digital key to unlock access to the programming features of the ZLED Bit Editor app.
When launching the app for the first time, you’ll be prompted to enter this ID:
-
If the correct Access ID is entered, the editor tabs will unlock and become available.
-
If the wrong Access ID is used, the app will display a black screen with an exclamation icon, and the editor functions will remain hidden.
This system ensures that only authorized users can make changes to the light behavior.
If the app isn’t connecting to your ZLEDS controller, try the following troubleshooting steps:
-
Ensure your lights are powered on.
The Bluetooth module only activates when the tail lights receive power (usually when running lights are on). -
Enable Bluetooth permissions.
Make sure the ZLED Bit Editor app has all required permissions (Bluetooth, location, etc.) — especially on Android 11+. -
Select the correct device.
When the Bluetooth scan list appears, select the device labeledZLEDS-XXXX. -
Restart the app and power cycle the lights.
If tabs do not appear or the screen remains black:-
Close the app completely.
-
Turn the lights off for 5–10 seconds.
-
Turn the lights back on.
-
Reopen the app.
-
-
Verify Access ID.
If the wrong Access ID is entered, the app will block access with a black screen and exclamation icon.
If issues persist, try reinstalling the app or contacting ZLEDS support for further assistance.
Technically, yes — but it’s important to understand that resetting the controller completely wipes all memory, including the stored presets for every function (Running, Brake, Signal, Reverse, and Strobes). This will disable all lighting behavior until you re-upload new presets.
After a reset, the tail lights will no longer respond as expected until each tab is reprogrammed using the ZLED Bit Editor App.
🧪 Tip: Use the MagicHat 1–5 switches to verify that each function is properly assigned after reprogramming.
⚠️ Warning: Only perform a reset if you are prepared to fully reconfigure your lights from scratch.
Each tab in the ZLED Bit Editor App corresponds to a lighting function on your tail light setup:
| Tab | Function |
|---|---|
| Tab 1 | Running Lights / DRLs |
| Tab 2 | Brake Lights |
| Tab 3 | Turn Signals |
| Tab 4 | Reverse Lights |
| Tab 5 | Strobes / Showcase Effects |
Each tab has its own independent sequence and configuration. When uploading a preset in a tab, it saves that behavior for that specific function.
💡 Tip: Use the switchback options and memory bank slider to control priority and layering between tabs if using overlapping bit/channels.
The “Sync Presets” function downloads a set of default animation presets from ZLEDS’ online repository into your phone.
These presets include example configurations for:
-
Running lights
-
Brake sequences
-
Turn signals
-
Strobes
-
Reverse lights
Once synced, you can:
-
Browse them using the arrows inside each tab.
-
Upload them directly to your tail light controller.
-
Use them as a starting point for your own custom animations.
🔁 Note: Syncing does not overwrite your lights — it only loads new options into the app’s local memory.
To safely reset or wipe all memory presets on your ZLEDS controller, follow this exact procedure:
🛠️ Reset Instructions:
-
Make sure the correct Access ID is set and accepted.
If the wrong ID is used, the controller will not respond properly (you’ll see a black screen with an exclamation icon). -
Open the ZLED Bit Editor App.
-
Go to the Menu > Access ID section.
-
In the Access ID field, type the word:
RESET(in all caps). -
Wait a few seconds after submitting.
-
Go back to Menu > Access ID, and now enter your original PIN (security code).
-
Power off the tail lights, wait 3–5 seconds, and power them back on.
🧠 What happens next?
All memory slots and stored functions will be wiped. The controller is now blank and must be reprogrammed.
✅ Use the Magic Hat switches to verify functions are cleared.
📤 Upload all presets again using the Bit Editor app or sync defaults from the cloud.
To download the official default presets from the ZLEDS server and store them in your app:
🔧 Steps to Sync Default Presets:
-
Ensure your phone has internet access.
Wi-Fi or mobile data is required to access cloud files. -
Make sure you’re connected to the ZLEDS controller.
The app must be actively paired with the lights, and the correct Access ID must be set. -
Open the ZLED Bit Editor App.
-
Tap the ☰ Menu icon, then select “Sync Presets”.
-
Wait for the download to complete.
The app will automatically import the default preset files into memory.
📝 Tip:
Once synced, use the arrows at the top of each tab (1–5) to browse through the downloaded presets, then press the upload icon to send them to the tail lights.
The Switchback Frame is a feature used to prioritize lighting behavior between overlapping functions like running lights, signals, or strobes.
🔧 How it Works:
Each function tab (1–5) in the ZLED Bit Editor is assigned a priority:
-
Tab 1 has the lowest priority
-
Tab 5 has the highest priority
When two tabs use the same output bits, the higher-priority tab can temporarily override the lower one using the Switchback Frame setting.
For example:
-
If Tab 1 uses bits 1–10 for running lights
-
And Tab 2 (turn signal) also uses bits 5–10
-
You can enable bits 5–10 in the Switchback Frame of Tab 2
💡 Result: When Tab 2 is active, it masks bits 5–10 from Tab 1 temporarily — ensuring that the signal animation cleanly overrides the running lights.
🛑 Important:
Switchback only masks the selected bits temporarily. When the higher-priority function finishes, control returns to the lower-priority tab automatically.
No — once a reset is performed, all memory slots are erased and the lights will no longer function until all tabs are reprogrammed.
✅ Always verify the full light functionality using the Magic Hat switches before performing a reset, and consider syncing your presets to the app beforehand.
The Upload Preset button sends your current tab’s animation sequence (all configured frames) to the ZLED controller’s memory slot selected via the top slider.
Each tab (1–5) stores a different function (e.g. Running, Brake, Signal), so you must upload presets tab by tab.
The app uses a custom internal structure to store presets in the app’s memory — not as user-visible files. Currently, there’s no manual export/import, but all presets remain stored on your phone after download via the “Sync Presets” option.
This indicates the Access ID you’ve entered doesn’t match the controller’s ID.
Go to Menu → Access ID, enter the correct code (often written on the controller label), and restart the app. If the ID is correct, all editor tabs will become available.
📲 ZLED Bit Editor CASE 15 Commands
🎛️ B1–B4 Case Commands
B1–B4 bits are part of each frame’s data in a ZLEDS animation. When a frame starts with a value between 1 and 15, these bits trigger a built-in command instead of lighting up LEDs directly. These commands let you adjust playback behavior on the fly, such as brightness, speed, or fade style, all within the animation itself.
Case 1 through 14 commands will still display LEDs based on the values from L1–L40, allowing each frame to both light up and adjust playback characteristics.
Case 15 is reserved for advanced instructions. In this mode, the LEDs from the last non–Case 15 frame remain lit while the new frame uses its L1–L40 data exclusively for internal control actions like memory jumps, loop logic, or playback rules.
This allows sequences to adapt dynamically as they play, giving you professional-looking results without needing external controls.
🟠 = Bit ON, ⚪ = Bit OFF
💡 PWM Brightness (L1–L4)
| Value | L1–L4 | Description |
|---|---|---|
| 0 | ⚪ ⚪ ⚪ ⚪ | No change |
| 1 | ⚪ ⚪ ⚪ 🔴 | Lowest Brightness Setting |
| 3 | ⚪ ⚪ 🔴 🔴 | Medium Brightness |
| 14 | 🔴 🔴 🔴 ⚪ | Highest PWM Brightness |
| 15 | 🔴 🔴 🔴 🔴 | Constant ON (no PWM) |
⏩ Playback Speed (L5–L8)
| Value | L5–L8 | Description |
|---|---|---|
| 0 | ⚪ ⚪ ⚪ ⚪ | No change |
| 1 | ⚪ ⚪ ⚪ 🔴 | Slowest playback |
| 3 | ⚪ ⚪ 🔴 🔴 | Slightly faster |
| 7 | ⚪ 🔴 🔴 🔴 | Mid-speed |
| 12 | 🔴 🔴 ⚪ ⚪ | Fast |
| 15 | 🔴 🔴 🔴 🔴 | Fastest playback |
🌅 Fade In (L9–L10)
| Value | L9–L10 | Description |
|---|---|---|
| 0 | ⚪ ⚪ | Instant ON (default) |
| 1 | ⚪ 🔴 | Slowest fade in |
| 2 | 🔴 ⚪ | Medium fade in |
| 3 | 🔴 🔴 | Fast fade in |
🌇 Fade Out (L11–L12)
| Value | L11–L12 | Description |
|---|---|---|
| 0 | ⚪ ⚪ | Instant OFF |
| 1 | ⚪ 🔴 | Long fade out |
| 2 | 🔴 ⚪ | Medium fade out |
| 3 | 🔴 🔴 | Short fade out |
🧠 Memory Slot Jump (L13–L16)
| Value | L13–L16 | Description |
|---|---|---|
| 0 | ⚪ ⚪ ⚪ ⚪ | No change |
| 1 | ⚪ ⚪ ⚪ 🔴 | Jump to Slot 1 |
| 5 | ⚪ 🔴 ⚪ 🔴 | Jump to Slot 5 |
| 10 | 🔴 ⚪ 🔴 ⚪ | Jump to Slot 10 |
| 15 | 🔴 🔴 🔴 🔴 | Jump to Slot 15 (last available memory slot) |
🎞️ Mini Loop Start Frame (L19–L24)
Marks which frame should begin the mini-loop. Must be paired with a valid repeat count (see next table), or this command will be ignored.
| Value | L19–L24 | Description |
|---|---|---|
| 0 | No action | |
| 1 | Start loop at Frame 1 | |
| 5 | Start loop at Frame 5 | |
| 17 | Start loop at Frame 17 | |
| 33 | Start loop at Frame 33 (maximum supported) |
🔁 Mini Loop Repeat Count (L25–L32)
Defines how many times to repeat the mini-loop. If set to 0, the mini-loop command will be ignored.
| Value | L25–L32 | Description |
|---|---|---|
| 0 | Disable loop | |
| 1 | Repeat 1 time | |
| 3 | Repeat 3 times | |
| 16 | Repeat 16 times | |
| 255 | Maximum repeat count |
⚠️ Disclaimer
All B1–B4 CASE commands have been tested extensively. However, due to the open-ended way these commands can be combined, there may still be unintended results.
The ZLEDS system does not currently include safeguards to prevent conflicting command combinations. Using multiple CASE commands in quick succession or applying them improperly may result in:
- Flickering or frozen LEDs
- Unexpected brightness or speed shifts
- Playback glitches or controller confusion
Tip: Test your custom sequences thoroughly before live use.
Back-to-back CASE commands may stack or override depending on the effect. For example, increasing brightness followed by instant off may cancel the visual change. It’s best to space them between visual frames for smooth playback.
Yes, multiple CASE commands can be used across a sequence. However, poor combinations or improper order may cause glitches or unwanted behavior, especially without visual frames between them.
Yes. CASE commands are stored as part of the animation sequence in memory, just like visual frames. Each one counts as a frame and is executed during playback.
A frame is interpreted as a CASE command when the B1–B4 bit pattern matches a value from 1 to 15. These are reserved and treated as instructions rather than LED output data.
Not currently. The app does not have built-in safeguards or validation for unsafe combinations. It’s recommended to test your sequence carefully and avoid stacking multiple CASE commands without purpose.
⚙️ CASE Overview
- Triggered when B1–B4 = 1111 (
🔴🔴🔴🔴) - L1-L40 are used to define custom attributes
🧠 What makes it different?
- CASE uses additional bytes in the frame to define dynamic behavior
- It’s essentially a mini-program embedded in your animation
- This enables advanced logic such as:
- Looping a range of frames (mini-loops)
- Switching memory slots mid-sequence
- Overriding brightness, speed, and fade temporarily
- Triggering timed or reactive lighting effects
⚠️ Important Notes:
- CASE is powerful but risky if misused
- If the data bytes are missing, invalid, or misaligned, you may experience:
- – Skipped frames
- – Frozen LEDs
- – Unstable or broken playback
- No app safeguards are currently in place, so test carefully
📘 CASE Command Table
| Command Name | Bits | What It Does |
|---|---|---|
| MiniLoop Start | L17–L24 | Defines the start frame for a mini-loop. Must be ≥2 and less than total frames. |
| MiniLoop Count | L25–L32 | How many times to repeat the mini-loop. Range: 1–255 |
| Memory Slot | L13–L16 | Switches to a new memory bank or sequence slot (1–15) |
| Set Brightness | L1–L4 | Temporarily overrides brightness level. Range: 1–15 |
| Set Speed | L5–L8 | Temporarily overrides playback speed. Range: 1–15 |
| Fade In | L9–L10 | Sets fade-in style: 0 = instant, 3 = very slow |
| Fade Out | L11–L12 | Sets fade-out style: 0 = instant, 3 = very slow |
🧩 Example:
You might use CASE 15 to loop frames 2–6 three times, or to temporarily dim all LEDs during a strobe effect.
Yes. Unlike standard CASE commands (1–14), CASE 15 is designed to combine multiple dynamic instructions into a single frame.
Each command uses different bits in the extra data bytes, so they don’t conflict.
Example:
One CASE 15 frame can simultaneously:
- Start a mini-loop
- Set temporary brightness
- Adjust fade-in/fade-out timing
- Switch memory slots
The extra bytes after the 🔴🔴🔴🔴 header are divided into bit fields, like so:
| Field | Purpose |
|---|---|
| L1–L4 | Brightness override |
| L5–L8 | Playback speed |
| L9–L10 | Fade In timing |
| L11–L12 | Fade Out timing |
| L13–L16 | Memory slot switching |
| L17–L24 | MiniLoop start index |
| L25–L32 | MiniLoop repeat count |
If you set values in multiple fields, the controller will apply all of them during that frame.
No strict order is required. The firmware applies all configured fields within the frame in a logical sequence:
-
Playback settings (speed, brightness, fade)
-
Loop setup
-
Memory slot switch (if any)
-
Continue to next frame
Only the fields that contain non-zero or valid data will be applied.
For example, if only L5–L8 (speed) is set and everything else is zero, only the speed override will take effect.
CASE 1–14 perform a single, fixed effect like changing brightness or speed.
CASE 15, on the other hand, is a multi-function instruction frame that can apply several effects at once using extended bits. It behaves more like a “control program” inside your sequence.
Yes, but the effect depends on where it appears. For example:
-
A fade or brightness override placed before a visual frame will affect that frame.
-
A mini-loop placed at the end of the sequence may do nothing if the loop target is out of bounds.
Always test placement carefully.
The sequence may become trapped, repeatedly looping frames.
To prevent this:
-
Always verify the loop end is reachable
-
Don’t stack loops within loops
Yes. You can combine:
-
Fade Out setting (L11–L12)
-
Memory Slot switch (L13–L16)
This allows you to create smooth transitions between sequences across banks.
Yes. While there’s no dedicated “strobe” bit, you can simulate it by:
-
Rapidly alternating brightness with looped frames
-
Setting fade times to instant
-
Combining mini-loops with short-duration frames
-
Use the ZLEDS Bit Editor app to build one command at a time
-
Start with brightness or speed overrides (safe effects)
-
Test on a short 4–5 frame sequence before expanding
-
Avoid using loop counters without a clear end
CASE 15 is powerful, but it follows strict rules to avoid playback errors. If these conditions aren’t met, the controller will ignore the command and continue normal playback.
🔄 Mini-Loop Rules:
-
✅ Starting frame must be 2 or higher
Frame 1 is reserved for header/timing and cannot be looped. -
✅ Starting frame must be less than the total number of frames in the sequence
You can’t loop beyond the end of the animation. -
✅ Mini-loop count must be at least 1
If the loop count is 0 or unset, the mini-loop is skipped entirely.
🧠 Memory Bank Switching Rules:
-
✅ Target memory slot must already contain a saved sequence
If the selected memory bank is empty or invalid, the switch is ignored.
⚠️ Why these rules matter:
These checks prevent the controller from crashing, freezing, or repeating empty data. Always validate your CASE 15 frame structure and test your sequences before deploying them in a final setup.
⚠️ If your switchback frame contains a Case 15 command, it will be ignored during playback.
📦Product Options & Features
Each Stage represents a different level of features and internal wiring. These options are consistent across most ZLEDS products:
- 🔹 Stage 1 – Basic Functional Setup:
A clean, fully functional LED setup without animations or sequences. Just plug-and-play running lights, brakes, turn signals, and reverse (when applicable). - 🔸 Stage 2 – Sequential Upgrade:
Adds sequential lighting effects using our in-house S10 modules. The sequence applies to either the turn signals, brake lights, or both — depending on the product. - 🔶 Stage 3 – Bluetooth Programmable:
Unlocks full control using the ZLEDS Bit Editor App (iOS & Android). You can assign custom startup animations, running light behaviors, brake sequences, turn signals, and strobe modes. - 🟥 Stage 4 – Full Channel Utilization:
Uses revised LED panels with additional segments, allowing every output channel of the controller to be used. Ideal for customers seeking maximum animation flexibility and visual impact.
No — each Stage is wired differently depending on its level of functionality:
- 🔹 Stage 1: Uses standard LED connections for basic brake, running, and turn signals.
- 🔸 Stage 2: Includes internal S10 modules that manage sequential effects. This requires additional wiring and signal routing inside the light assembly.
- 🔶 Stage 3: Introduces a Bluetooth controller, multiple signal inputs, and animation control wiring to support programmable features via the ZLEDS Bit Editor app.
- 🟥 Stage 4: Expands on Stage 3 by adding even more LED zones and internal connections to use all available output channels on the controller.
🧠 Important: These internal differences mean each stage is designed and assembled uniquely — upgrading later usually requires a full rebuild.
Yes, in most cases upgrades are possible — but it depends on the original stage, product design, and internal wiring.
- 🔁 Stage 1 ➡️ Stage 2: If your product was originally built as Stage 1, we can usually upgrade it to Stage 2 by retrofitting our S10 Sequential Module. This involves sending the part back for service.
- 📲 Stage 2 ➡️ Stage 3: Upgrading to Stage 3 requires installing a new controller and replacing the internal LED boards with programmable-compatible ones. This is a more involved retrofit and priced accordingly.
- ⚙️ Stage 3 ➡️ Stage 4: Upgrading from Stage 3 to Stage 4 involves adding custom panels with more LED segments and rerouting wiring to utilize all available controller channels.
⚠️ Note: Not all older models support backward compatibility. Contact us with your original order details so we can verify eligibility.
It depends on the product and service type:
- ✅ Full Retrofit Services: In most cases, the original OEM connector is reused, making the system fully plug-and-play with no additional wiring required.
- 🧰 DIY Kits or Universal Modules: These typically come with color-coded wires (e.g., Ground, Park, Signal, Brake) that must be tapped into your vehicle’s factory harness.
- 🔌 Semi Plug-and-Play: Some products use bulb adapters or quick-connect harnesses to simplify installation, but still require a few connections — especially for sequential modules or Bluetooth controllers.
⚠️ Note: If you’re unfamiliar with automotive wiring, we recommend having the product installed by a professional.
The ZLEDS Bluetooth Controller gives you full control over your lighting setup using the ZLED Bit Editor mobile app (available for both iOS and Android).
- 📱 App Functions: Configure startup animations, running lights, brake sequences, turn signals, and strobe effects with precision.
- 🌐 Cloud Sync: Access pre-built animation presets and receive remote support or updates via cloud sharing.
- 💾 Save & Recall: Store multiple profiles and quickly switch between them from the app interface.
- 🎛️ In-App Preview: Use the app’s magichat switches to toggle each function sequence.
⚠️ Note: Only Stage 3B and Stage 4 builds include the Bluetooth controller and app functionality.
In most cases, ZLEDS retrofit services are designed to be plug-and-play with your vehicle’s OEM harness.
- 🧩 OEM-Compatible: Many setups reuse the factory connector to simplify installation and ensure proper signal mapping.
- 🔧 Minimal Wiring Required: If extra wiring is needed (such as for a reverse light or sequential module), it will be noted on the product page.
- 🎨 Color Coded Wires: Any required wires are color coded (not labeled), and a diagram or guidance will be provided upon request.
⚠️ Note: We always recommend professional installation if you’re unfamiliar with basic wiring procedures or want the cleanest result.